You’ve seen all the amazing furniture on Instagram. You’ve heard other designers say what a lifesaver Buildlane has been in sourcing custom furniture. But what exactly is the process that makes it so special?
This deep dive has been months in the making, as I had a very special project of my own to illustrate the process. Let’s begin!
The Project

My in-laws live in Florida and they are parrot-heads. Jimmy Buffet wasn’t ever really on my radar until I got married. But once you do a single vacation in the keys, you kind of understand it.
When we recently purchased a new home, one of our must-haves was met with a “next-gen suite.” A bonus dwelling area to provide safe haven whenever my in-laws want to escape Florida for awhile. And as a sort of joke / not joke, we’ve planned to decorate it like a Margaritaville hotel room. Well, almost. After much thought we decided to incorporate some less Atlantic Ocean vibes and more Pacific Ocean vibes as that’s near where we live.
All that to say I knew the first piece of furniture we would need was a sleeper sofa to pull double duty in the space.
Step 1 – Creating the Design
My wife did a Pinterest deep dive and landed on a simple slope arm design. We initially gravitated to this design because it is often paired with a skirt, which we saw that in the Margaritaville room. However, I came up with the idea to do some blue contrast welting and the skirt felt like a mismatch for that idea.
Armed with my daughter’s crayons and a pen I made some changes to the inspiration photo my wife had started with. I also wanted to lose the mid-century style base and do a black block leg style instead.

Step 2 – Submitting the RFQ (Request For Quote)
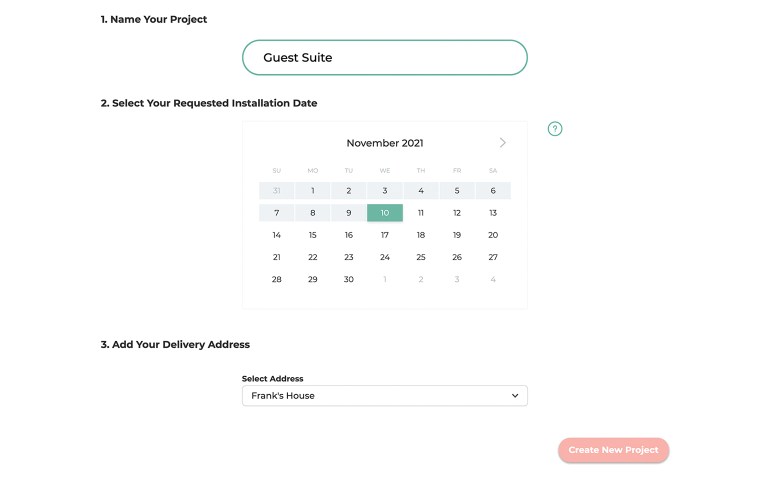
I like to create a project first so let’s do that.

Next we’re going to create an RFQ (Request For Quote) within that project. The form is pretty self-explanatory but I’ve linked to a video below the screenshot with me walking through this quote request.

That is all you need to do. I can then expect to receive a quote back with lead time and yardage in 3-5 business days. If I left anything too unclear to provide a quote Sam our quote moderator will reach out and ask to clarify any details.
Step 3 – Receiving Quote
I received an email that my quote was ready so let’s check it out.

Quote looks great. I can see they’ve called out the price, the lead time, and how much fabric I will need to buy. I’m going to hit the ‘Approve Quote’ button and get this project started. Once I do that I can expect to receive an invoice from Freshbooks for a 50% deposit on the sofa. The final 50% will be requested after I’ve seen finished photos at the end of the project and approve them.
Step 4 – Sending Fabric (Pre-Production)
Once you are in Pre-Production Buildlane’s shop drawing team is going to begin working on your shop drawing. In the meantime, it is your job to get all the COM to the factory. I have my waterfall of fabrics in hand from the fabric vendor Dorell and I am going to select Chance Sand for the body and Chance Peacock for the contrast welt.
Next I’m going to open up Ivy (or your purchasing software of choice) and send off that PO. For the ship to address I am simply copy and pasting the instructions from Buildlane.

I will then go back to Buildlane and write in those fabric selections and confirm that I have ordered them and they are on their way to the factory. By doing this step the factory is now alerted to be expecting that fabric. And if you’ve copy and pasted that exact sidemark they will quickly be able to match the fabric to your project.
Once your fabric is received by the factory they will take a photo of it and you’ll get an email notification (as happens with all COM, not just fabric). This step is really to help you follow along the process as I can’t even remember a time when a fabric house shipped the wrong fabric and it was caught by the factory photo. They are pretty good about making sure they send the right stuff!

Step 5 – Selecting Wood Finish (Pre-Production)
I picked a Buildlane stock finish for this sofa. However, much of the time you might be sending a finish sample to match. Just like COM you’ll be given shipping instructions and you’ll need to get your sample in the mail. From there the factory will acknowledge receipt of the sample and make a copy (usually takes about a week). They will then send your sample and the copy back to you via FedEx so you can compare them in person.
You’ll need to visit the piece page and press the approve button (or request changes if you need the factory to make another sample).

Step 6 – Approving Shop Drawing (Pre-Production)
A week after you click that approve button you should receive your shop drawing. If everything looks good you can go ahead and approve it.
If you have changes you’d like I find that “red line” revisions are best. Open up your favorite image editing software or print that baby out and do it by hand. You’re going to want to make it as clear as you can what changes you’d like on the drawing.
Once you do that you can go back to Buildlane and upload your revisions along with any notes to make it more clear.

Once everything looks good you can approve the shop drawing and we are ready to go into Production!
Step 7 – Receiving Completion Date
Once all assets have been completed in Pre-Production your piece will be assigned a due date (based on the lead time previously quoted) and you will get an email notification letting you know you are now in Production. Note that doesn’t happen automatically as our Production team has to review everything before processing, but is usually the same day that all the assets turn green.
Get excited because on that date (or often sooner) you’ll get an email letting you know the piece is done and you have photos to review.

Step 8 – Responding to Messages
I do want to point out that through the process you’ll be receiving messages through the app. These will happen during quoting, pre-production, production, and shipping (especially shipping). And these messages will be coming from your account manager, our production team, and the builders themselves.
Anytime you receive a message everyone from your team that is assigned to this project will get an email notification. And conversely anytime you leave a message the appropriate parties will be notified so they can take action.
Email is great, but keeping communication within the app is a great way to make sure everyone is on the same page.

Step 9 – Reviewing Completed Photos
When the ‘completed by date’ finally arrives you’ll receive an email letting you know the piece has been completed and you can now review your finished photos.
If everything looks good you can click the ‘Approve to ship’ button. If you want to see more photos, maybe a close up of a particular seam or something, not a problem, just leave a message and we’ll accomodate the request.
Danielle from our shipping department is also going to reach out at this point to coordinate shipping. If you haven’t already requested shipping quotes she is going to get those for you. You’re free to use your own shippers but we have a network of shippers that we have cultivated over the years and the rates are reasonable and the damage issues are low.
Once you’ve approved the photos and picked a shipper with Danielle you’ll receive your final invoice (which will include shipping).
Only thing left to do is receive the furniture!
Step 10 – Receiving Sofa
If you’ve been following along with the video links below each screenshot you may have noticed something. The sofa we’ve been building has been in the background the whole time!

Keep in mind this room is by no means finished, in fact, this sofa is really the first thing we have done. This is not a beautiful install photo, this is me quickly snapping something on my camera for this article. But trust me that the sofa looks amazing and is beyond comfortable. It has been my spot of choice to watch my Cleveland Browns this year (woof woof!).

Although, I have to admit, my favorite thing about the sofa is that it was made here in Los Angeles by some of the hardest working and talented craftspeople in the world.
We plan to fill that wall above the sofa with vacation photos all framed in a variety of tropical lookin frames.
And I like to have fun with the little details in life so I added an Easter Egg to the room. The day the sofa finished I stopped by the factory with a couple of tiki mugs. Haniel (our production manager) took a photo of me and Flavio imagining ourselves on an island hideaway right from the factory floor. That photo will join the others right above the very sofa in the photo.


Nice to know that a couple of old Parrotheads can provide a little inspiration every now and then!